In this article, we will go over how to utilize Keycloak for OAuth2 authentication and Open Policy Agent (OPA) for topic-level authorization within Confluent Kafka. At the time of writing this, LDAP is the only natively supported authentication and authorization mechanism within Confluent (besides custom ACLs via CLI). Although there are many other cloud authentication providers, the platform our team is deploying to only supports Keycloak.
Prerequisites
This blog is intended for informational use rather than as a tutorial, but if you wanted to follow along, you will need to run the following:
Running Keycloak Locally via Docker
Follow the steps below to start Keycloak, if one is not already running.
Run an instance of Keycloak via Docker:
docker run -d -e KEYCLOAK_USER=<USERNAME> -e KEYCLOAK_PASSWORD=<PASSWORD> -p 8080:8080 jboss/keycloak- Login in to the Keycloak dashboard at: http://localhost:8080
- Create at least two (2) clients:
- Click on the
Clientstab and click thecreatebutton. Name the client:kafka_broker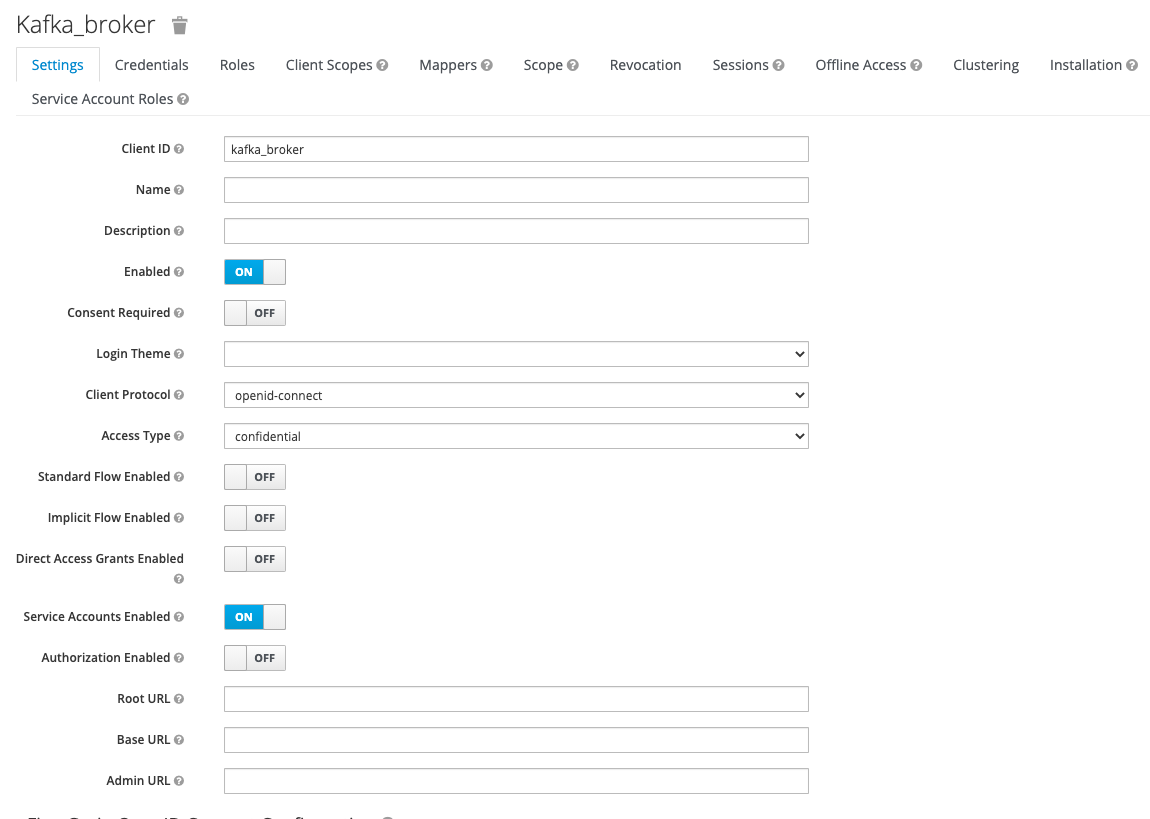
- Follow the same steps to create a consumer client and name it:
test_consumer. - Note: To validate that the properties above were set properly, a
Credentialstab should appear at the top with aclient_secret.
- Click on the
Authentication via Keycloak
First, we will need to configure a couple properties for the Kafka broker. Since our broker is configured to listen on multiple interfaces (INTERNAL and EXTERNAL), the following properties were set just for the EXTERNAL listener since that is how clients will be connecting. If you are only listening on the default one, you can remove: listener.name.external for each of the properties.
<div class="language-plaintext highlighter-rouge">
<div class="highlight">
<pre class="highlight"><code># Format: listener.name.<listener_name>.sasl.enabled.mechanisms=OAUTHBEARER
listener.name.external.sasl.enabled.mechanisms=OAUTHBEARER
</code></pre>
</div>
</div>Additional documentation can be found here.
Next, we have to implement 2 classes that will communicate with an external OAuth2 server (Keycloak) to retrieve, validate (introspect), and renew tokens for each Kafka broker and client.
Both classes implement org.apache.kafka.common.security.auth.AuthenticateCallbackHandler to configure callbacks.
OAuthAuthenticateLoginCallbackHandler: Handles authentication for brokers and clientsOAuthAuthenticateValidatorCallbackHandler: Created for the broker and handles validating the credentials provided by the clients
Once these classes have been implemented, we can specify the corresponding properties for the Kafka broker:
<div class="language-plaintext highlighter-rouge">
<div class="highlight">
<pre class="highlight"><code>listener.name.external.oauthbearer.sasl.login.callback.handler.class=tech.goraft.kafka.oauthbearer.OAuthAuthenticateLoginCallbackHandler
listener.name.external.oauthbearer.sasl.server.callback.handler.class=tech.goraft.kafka.oauthbearer.OAuthAuthenticateValidatorCallbackHandler
</code></pre>
</div>
</div>
When a broker or client is attempting to authenticate, these properties are used since we already specified that the enabled mechanism is OAUTHBEARER. Without sasl.enabled.mechanisms set to OAUTHBEARER, these properties will be ignored.
Please note that these examples are utilizing the EXTERNAL listener.
Updating the Existing Kafka Properties
We have already added a few configuration properties to Kafka’s server.properties file, but now we need to provide the Keycloak specific values to handle authentication for the broker when starting Kafka.
OAuth Properties
The following fields are required for every broker and client for authentication.
- OAUTH_LOGIN_SERVER: The OAuth server’s full URL (including either ‘http’ or ‘https’)
- OAUTH_LOGIN_ENDPOINT: Endpoint where clients pass their credentials to obtain an access token.
- Example:
/token
- Example:
- OAUTH_LOGIN_GRANT_TYPE: The way to exchange a user’s credentials for access token
- This will normally be set to
client_credentialssince we are expected to pass in aclient_idandclient_secret.
- This will normally be set to
- OAUTH_CLIENT_ID: The client name that is stored in the OAuth server
- OAUTH_CLIENT_SECRET: The secret corresponding to the client ID
- OAUTH_INTROSPECT_SERVER: The OAuth server’s full URL (including either ‘http’ or ‘https’). This is typically the same value that is used for
OAUTH_LOGIN_SERVER- Example:
http://localhost:8080/auth/realms/master/protocol/openid-connect
- Example:
- OAUTH_INTROSPECT_ENDPOINT: Endpoint used to check the validity of an access token.
- Example:
/token/introspect
- Example:
- OAUTH_ACCEPT_UNSECURE_SERVER: OAuth server with self-signed certificate.
- Accepted values are:
trueorfalse - If not utilizing SSL certificates, set to
false
- Accepted values are:
Using the example above, we now need to set the proper values in the server.properties file. For the client_id and client_secret, utilize the corresponding values from the Prerequisites section for the kafka_broker client. Append these properties to the end of the existing file (Be sure to replace the OAUTH_CLIENT_SECRET):
<div class="language-plaintext highlighter-rouge">
<div class="highlight">
<pre class="highlight"><code>listener.name.external.sasl.enabled.mechanisms=OAUTHBEARER
listener.name.external.oauthbearer.sasl.login.callback.handler.class=tech.goraft.kafka.oauthbearer.OAuthAuthenticateLoginCallbackHandler
listener.name.external.oauthbearer.sasl.server.callback.handler.class=tech.goraft.kafka.oauthbearer.OAuthAuthenticateValidatorCallbackHandler
listener.name.external.oauthbearer.sasl.jaas.config=org.apache.kafka.common.security.oauthbearer.OAuthBearerLoginModule required
OAUTH_LOGIN_SERVER='http://localhost:8080/auth/realms/master/protocol/openid-connect'
OAUTH_LOGIN_ENDPOINT='/token'
AUTH_LOGIN_GRANT_TYPE='client_credentials'
OAUTH_CLIENT_ID='kafka_broker'
OAUTH_CLIENT_SECRET='<kafka_broker_secret>'
OAUTH_INTROSPECT_SERVER='http://localhost:8080/auth/realms/master/protocol/openid-connect'
OAUTH_INTROSPECT_ENDPOINT='/token/introspect'
OAUTH_ACCEPT_UNSECURE_SERVER='true';
</code></pre>
</div>
</div>For the sasl.jaas.config property, we pass in the class used for OAUTHBEARER (org.apache.kafka.common.security.oauthbearer.OAuthBearerLoginModule) along with the required properties to authenticate with Keycloak.
Now we can start up Confluent Kafka.
Authorization via OPA
Once users have authenticated via Keycloak, we now want to control topic-level access via OPA. OPA can be integrated with Kafka to enforce access control over Kafka topics. Policies are defined using OPA’s Rego query language. When OPA attempts to check permissions for a given user, it extracts the principalName that was specified when Keycloak generated the JWT and uses it as the sanitizedUser value. With this knowledge, we were able to pass the client_id at the time when the JWT was created, so that it matches the users stored in OPA. We leveraged the OpaAuthorizer class provided by OPA’s contrib project to handle whether the user is authorized to perform the operation (i.e., READ, WRITE) on a resource (i.e., topic).
The OpaAuthorizer class implements the kafka.security.auth.Authorizer class to handle authorization.
The following properties need to be set in Kafka’s server.properties file:
<div class="language-plaintext highlighter-rouge">
<div class="highlight">
<pre class="highlight"><code># Specify the custom Authorizer class that was created
authorizer.class.name=tech.goraft.kafka.opa.OpaAuthorizer

# OPA's endpoint that contains the logic to determine if the user is allowed to execute the intended operation (i.e., read from a topic)
opa.authorizer.url=http://opa:8181/v1/data/kafka/authz/allow

opa.authorizer.allow.on.error=false

opa.authorizer.cache.initial.capacity=100

opa.authorizer.cache.maximum.size=100

opa.authorizer.cache.expire.after.ms=10000
</code></pre>
</div>
</div>
Example Rego file
This Rego file contains the policies that the OpaAuthorizer uses to determine what a user has access to. The Rego file can be stored in multiple ways depending on you deployment process. In our case, we added it to a Kubernetes Deployment file for the OPA pod.
In this example, we are granting the test_consumer access to read the foo topic. The users listed in this Rego file should match the client ID in Keycloak.
<div class="language-plaintext highlighter-rouge">
<div class="highlight">
<pre class="highlight"><code>package kafka.authz

default allow = false

# Allow everything that is not explicitly denied
allow {
  not deny
}

# Deny block
deny {
  is_read_operation
  track_topic
  not consumer_is_whitelisted_for_foo
}

# Format: "easy_to_read_client_name": {"client_name_in_keycloak"}
# If the original client name stored in Keycloak contains not allowed characters (i.e., '-'), map it to an easy to read key name (on the left).
consumer_whitelist = {
  "test_consumer": {"test_consumer"},
}

topic_metadata = {
  "track": {"tags": ["track"]},
}

#-----------------------------------
# Helpers for checking topic access.
#-----------------------------------

foo_topic {
  topic_metadata[topic_name].tags[_] == "foo"
}

# Grant the 'test_consumer' user access to read from the 'foo' topic
consumer_is_whitelisted_for_foo {
  consumer_whitelist.test_consumer[_] == principal.name
}


# Helpers for processing Kafka operation input.
is_read_operation {
  input.operation.name == "Read"
}

is_write_operation {
  input.operation.name == "Write"
}

is_topic_resource {
  input.resource.resourceType.name == "Topic"
}

topic_name = input.resource.name {
  is_topic_resource
}

# This is where we grab the name of the user that was set when creating the JWT for the authenticated user
principal = {"name": name} {
  name := input.session.sanitizedUser
}
</code></pre>
</div>
</div>
Restart Kafka once the policies and configuration properties specified above have been added.
Kafka Consumer Example
Now that we have configured Keycloak and OPA with Confluent, we could test out how a client consumer would connect. In the Running Keycloak Locally via Docker section, we created a test_consumer client and granted it access to read from the foo topic. For this example, we are going to utilize the kafka-console-consumer tool.
First, we need to create the consumer configuration file with the necessary client properties. Be sure to replace the OAUTH_CLIENT_SECRET.
<div class="language-plaintext highlighter-rouge">
<div class="highlight">
<pre class="highlight"><code>echo "security.protocol=SASL_PLAINTEXT
sasl.mechanism=OAUTHBEARER
sasl.login.callback.handler.class=tech.goraft.kafka.oauthbearer.OAuthAuthenticateLoginCallbackHandler
sasl.jaas.config=org.apache.kafka.common.security.oauthbearer.OAuthBearerLoginModule required
OAUTH_LOGIN_SERVER='http://keycloak-http.bigbang.svc.cluster.local/auth/realms/master/protocol/openid-connect'
OAUTH_LOGIN_ENDPOINT='/token'
OAUTH_LOGIN_GRANT_TYPE='client_credentials'
OAUTH_CLIENT_ID='test_consumer'
OAUTH_CLIENT_SECRET='<test_consumer_secret>'
OAUTH_INTROSPECT_SERVER='http://keycloak-http.bigbang.svc.cluster.local/auth/realms/master/protocol/openid-connect'
OAUTH_INTROSPECT_ENDPOINT='/token/introspect'
OAUTH_ACCEPT_UNSECURE_SERVER='true';" > consumer.config
</code></pre>
</div>
</div>Refer to the OAuth Properties section for additional information on each of these properties.
Once these values are set, we can run the kafka-console-consumer.
kafka-console-consumer --topic foo --from-beginning --bootstrap-server kafka-0.kafka.confluent.svc.cluster.local:9092 --consumer.config consumer.config
You should see a message stating when the credentials will expire and that the refresh token will be handled automatically as well as the messages already in the topic.
Here is an example of the test_consumer successfully authenticating through Keycloak and OPA granting access to the foo topic:

Here is an example where the test_consumer attempted to read the bar topic, but received an unauthorized error from Kafka:

References
- Keycloak
- OPA

![Raft [R]DP Blog Post - Thumbnail Image](https://teamraft.com/wp-content/uploads/Raft-RDP-Blog-Post-Thumbnail-@2x.jpg)