CIO LEVEL SUMMARY (The TL;DR version)
- Follow up post on Initial Exploration of Hardware In the Loop post
- Demonstrable example of using cloud pipeline to compile, build, and deliver code to an embedded system (Arduino via RasberryPi)
- The majority of the code mentioned in this post is in the arduino-delivery-container repo
- Using Drone.io in Docker for implementing the CI/CD pipeline.
What are we after?

As a developer, sometimes a diagram is worth a 1,000 words. Taking a look at the one above, lets dive deeper into what we are trying to accomplish. Starting from left to right, we start at a low side with code that is in a PR. Then the code gets scanned and built. Once the container is built, it will be tested against a digital twin and/or test hardware. Once all the tests pass, the code is merged into a code and image repository. This brings us to the end of the low side. At this point we have a code base that is ready to be transferred into a high side, an air-gapped secure network. Within the high side, code/images will be available for deployment when the target device is connected to the network. In our case, we are using a Raspberry Pi as a “device manager” for the target embedded device to handle the deployment onto a production embedded system.
In this Post
In the last post we had left things off with the following TODOs:
- Code delivery from Pi to Arduino
- Code delivery from repo to Pi
- Code delivery from repo to Arduino
- Testing out QEMU and Docker as a digital twin
- Exploring the capabilities of Microsoft’s Azure Digital Twins
In this post, we will mainly be addressing the first 3 points, with the goal to deliver code to Ardiuno via Pi. To get everything working properly, we will address some of the fine grained technical aspects of getting things working with the particular technology stack chosen. Get ready for lots of little technical details.
Code delivery from Pi to Arduino using Ino
The first thing I had to get working is code delivery from a Raspberry Pi to the Arduino. There are quite a few IDE’s, including Arduino’s offical one, that will accomplish this task. Most of them require a GUI interface and won’t be much help in creating a CI/CD. After some more digging, turns out to be a problem that has been semi-solved already for me using the Ino tool. Ino is a “a command line toolkit for working with Arduino”. I should note that the project on GitHub is quite stale, but the tool worked flawlessly for our purpose here. Following Ino’s Quick Start, setting Ino up is as easy as:
# Install
sudo apt-get install python-pip
pip install ino

# Setup folder
mkdir arduinoTest
cd arduinoTest
After setting up Ino on Pi, you can run ino init which will create some folders and a blank sketch.ino file in a src folder. Then, edit the file with the Arduino code you want followed by a couple commands to compile and deliver the source code to the Arduino. The workflow looks something like this:
cd src
vi sketch.ino
ino build
ino upload
After all this and barring any error messages, the Arduino should be running any code that was in the sketch.ino file.
Containerize Ino
Ino worked great, but we want to take it a step further and have this done in a container. For things to work in a modern CI/CD pipeline, getting things working inside a container has become a requirement. To get Ino working we will need a Python2.7 container. I know what you are thinking – Python 2.7?!. I did say the Ino repo is quite stale… Let’s take a look at the Dockerfile that will help us:
FROM python:2.7.18 as builder

RUN apt-get update &&
    apt-get install -y arduino picocom &&
    pip install --upgrade pip &&
    pip install ino

ENTRYPOINT ["/bin/bash"]
As I have mentioned in my previous post, Docker can access host machine devices using the --device argument. We can build and run this container using:
docker build . -t ino-docker
docker run -it --device=/dev/ttyACM0 ino-docker:latest
From here we can follow the same procedure from before, but now we are running Ino inside a container which gets us a step closer to a fully operational CI/CD pipeline. Running the container in interactive mode is good for initial development, but what we really want is to have the container do all the work for us. For that, let’s look at an upgraded version of this Dockerfile:
FROM python:2.7.18 as builder

RUN apt-get update &&
    apt-get install -y arduino picocom &&
    pip install --upgrade pip &&
    pip install ino

WORKDIR /app

RUN ino init

FROM builder

COPY run.sh /app/run.sh
COPY src  /app/inos

ENTRYPOINT ["./run.sh"]
And the content of run.sh:
[ -z "$INO_FILENAME" ] && { echo "Need to set INO_FILENAME"; exit 1; }

echo "building & uploading ${INO_FILENAME}"
cat $INO_FILENAME > "src/sketch.ino"
ino build
ino upload
With this in place, we can copy multiple .ino files from a src folder into a Docker image and change the behavior/code on the Arduino using a single command. It will look something like this:
docker run --device=/dev/ttyACM0 -e INO_FILENAME=inos/one_leds.ino rafttech/arduino-delivery-container:latest
The code in one_leds.ino is directly from Arduino Blink Tutorial tutorial as a starting code. As excerpted, it makes a single LED blink. Now if we modified the code slightly to have 2 LEDs blink and we already had the code for it ready in a Docker image, updating the Arduino becomes as easy as:
docker run --device=/dev/ttyACM0 -e INO_FILENAME=inos/two_leds.ino rafttech/arduino-delivery-container:drone-arm
And now you should have 2 LEDs blinking, one after the other.
Code delivery from repo to Pi and from repo to Arduino
The next two TODOs from my previous post are very closely related. Any modern CI/CD requires some method of delivering code from a repo to where ever it is needed. In our case, there are 2 pipelines we are trying to establish, (1) repo to Pi and (2) repo to Arduino (our edge device). I decided to go with Drone.io for my CI/CD mainly because it seemed easier/lighter than running Jenkins and it is a great opportunity for me to take Drone.io for a test drive. Drone’s pipeline configurations are based on steps, with each step having a specific container. Here is an example pipeline taken from Drone’s pipeline docs
---
kind: pipeline
type: docker
name: default

steps:
- name: backend
  image: golang
  commands:
  - go build
  - go test

- name: frontend
  image: node
  commands:
  - npm install
  - npm run test
Configured properly, this pipeline will checkout a code repo and build and test a backend server using a go container and a frontend server using a node container. Note that these are 2 individual steps that make up a single pipeline. Drone supports multiple pipelines, more on that in a little bit.
Running a Drone Server
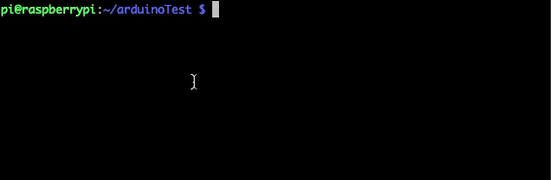
To get Drone working properly, there are a few things that need to be configured. For the code repo I used Github and the Drone GitHub Install Guide which was very straightforward. You will need to follow the instructions to create an OAuth Application on GitHub as well as create a shared secret. If you are running everything in the cloud, the instructions are great. Where the instructions fall short is when attempting to run the server on a localhost. The way GitHub OAuth works require a valid callback URL. This is used to redirect back to the Drone dashboard after successfully logging in using GitHub credentials. To solve this issue you will need some tunnel to localhost service. There are a few available, I used ngrok mainly because it’s free and on a Mac you can install it via Homebrew using brew cask install ngrok. After the installation, you will need to create an account and use ngrok authtoken <YOUR_AUTHTOKEN> to setup authentication. Once all that is done, use the command ngrok http <PORT> to expose your localhost to the web. If all goes well you should see something like this:
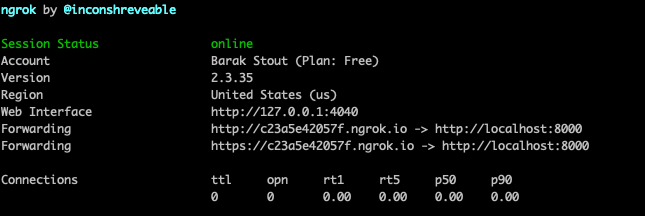
What you are looking after is the forwarding URL, in this case http://c23a5e42057f.ngrok.io. Everytime you run ngrok http <PORT> you will get a unique url, so if you stop it, you will need to reset the URL in the GitHub OAuth setting. Also don’t forget to include login at the end of your URL so GitHub will know where to redirect after verifying your identify. The reset is just step-by-step following the Drone documentation. You can get the server running in Docker using the command:
docker run -d
  --volume=/var/lib/drone:/data
  --env=DRONE_GITHUB_CLIENT_ID=
  --env=DRONE_GITHUB_CLIENT_SECRET=
  --env=DRONE_RPC_SECRET=
  --env=DRONE_SERVER_HOST=
  --env=DRONE_SERVER_PROTO=
  --publish=80:80
  --publish=443:443
  --restart=always
  --detach=true
  --name=drone
  drone/drone:1
If you are following along, make sure to set the Drone server host to the URL ngrok provided. The next step is to run a Drone Runner/Agent. I use Runner/Agent because I have seen them reffed as both in the documentation and in forums. Getting a Runner/Agent working is again following the Drone Runner Docs.
docker run -d
  -v /var/run/docker.sock:/var/run/docker.sock
  -e DRONE_RPC_PROTO=
  -e DRONE_RPC_HOST=
  -e DRONE_RPC_SECRET=
  -e DRONE_RUNNER_CAPACITY=2
  -e DRONE_RUNNER_NAME=${HOSTNAME}
  -p 3000:3000
  --restart always
  --name runner
  drone/drone-runner-docker:1
You will notice here that we use the DRONE_RPC_SECRET we created when we started the server and the DRONE_SERVER_HOST we got from ngrok before. Using these 2 docker run commands can be cumbersome, so I found a Drone docker-compose.yml file and modified it to fit my needs to spin up a Drone Server and Runner on my local MacBook. At this point everything was working great and I was able to create a simple test pipeline that was able to connect to the GitHub repo. The .drone.yml file I had to this point looked like this:
kind: pipeline
name: default

steps:
- name: publish
  image: plugins/docker
  settings:
    repo: docker.io/rafttech/arduino-delivery-container
    tags: [ "${DRONE_COMMIT_SHA:0:7}","latest" ]
    username:
      from_secret: DOCKERUSER
    password:
      from_secret: DOCKERPASS
Drone Pipeline for Arduino
Until now, I was running everything on my laptop, the pipeline was able to complete, compile code and push an image to DockerHub. However, the image will be using the wrong target architecture. MacBooks use amd64, for the container created by the pipeline to run on Raspberry Pi as we want, the container needs to be built using arm32. This problem quickly became a pain point for a variety of reasons.
After what seemed like too long, I ended up with multiple solutions. Let’s explore these:
- Corss build using
docker buildx– Docker “supports” multi architect builds, if you enable experimental features, run Docker with privileged access, and can getbuildxworking. After tinkering with this for a while, I was able to get it working on my laptop, but I couldn’t get this working within Drone. Drone dind pipeline might work here, but I wasn’t able to get it to work. When it does work, you can build and push images using:
docker buildx build --platform linux/amd64,linux/arm/v7,linux/arm/v6 -t rafttech/arduino-delivery-container:latest . --push
- Runner on Pi – Drone can build containers natively for multiple architecture, as long as it has a Runner with the same architecture. Drone uses a separate container for its server and for its runners. This means that I can keep the Drone server running on my laptop and run a separate Runner on the Pi that can build the image for the Pi. The down side for this approach is that I was using a Pi 3 that has limited resources and it took significantly longer to build (around x7). The configuration for this is automatically handled by the Drone server. There are 2 pipelines now that can run in parallel, if there are runners available to execute the pipeline.
---
kind: pipeline
name: arm

platform:
  os: linux
  arch: arm

steps:

- name: build arm
  image: plugins/docker
  settings:
    repo: rafttech/arduino-delivery-container
    auto_tag: true
    auto_tag_suffix: drone-arm
    username:
      from_secret: docker_username
    password:
      from_secret: docker_password

---
kind: pipeline
name: amd64

platform:
  os: linux
  arch: amd64

steps:

- name: build amd64
  image: plugins/docker
  settings:
    repo: rafttech/arduino-delivery-container
    auto_tag: true
    auto_tag_suffix: drone-amd64
    username:
      from_secret: docker_username
    password:
      from_secret: docker_password
-
Drone Manifest – Drone has another pipeline plugin that can be used for multi-arch Docker. I haven’t tried it out yet, but it might be promising. Like the previous plugin, it might require Drone to have a Runner on the target architecture. I haven’t tried this out yet.
-
QEMU – Using QEMU we can Run and Build ARM Docker Containers on x86. I haven’t tried that one either, but it seems like it would work well. To get it to work we will need to run Docker in
privilegedmode. This might be worth exploring if we end up using QEMU for simulations, more on that later.
Kubernetes, Simulations & Testing
So far, we have accomplished getting code to be built and deployed to an edge device. We have effectively put the hardware at the deploy stage, which is the end goal. For this work to be a complete Hardware-in-the-loop solution, we need to explore a couple more things.
-
Kubernetes – The work that we have done so far regarding HIL has been in the realm of Docker and using manual commands. Although the pipeline is fully automated at this point, it doesn’t complete the delivery without human intervention. The next iteration will need to include a fully automated delivery system and leveraging a container-orchestration system.
-
Digital Twins – Arguably the most beneficial portion of HIL is running new code against simulated hardware in the cloud. The last thing we want is to complete the cycle and have buggy code delivered to actual hardware. This would be a hardware-specific simulation that can checkout the code from the repo and run the code in a virtual environment along with any appropriate tests. In the last post about HIL I mentioned using QEMU or Microsoft’s Azure Digital Twins. Since then I found some more options that are worth exploring and we will be doing so in future posts.
-
Test Hardware – Along the line with a digital twin, the idea is to have dedicated hardware for testing that is part of the loop, but not the target device. This could be a hardware unit at the developer’s workspace or in a lab. The advantages here are to avoid having the first time we run new code on hardware be in the field. This will increase our confidence that we have flushed out any code or delivery problems – before we hit production. More testing along the loop means finding errors early on and solving them within our CI/CD.
-
Connectivity – Any modern CI/CD depends on having a constant network connection. After all, if we aren’t connected, how will the next step in the pipeline know what’s going on. The target devices we are trying to bring into the loop are not always connected to a network. This poses its own challenge of delivery of new code when the target device is offline. In some ways, having a Drone Runner on a device like a Pi might be able to remove this. Any CI/CD that targets devices that might go offline for extended periods of time would have to account for this. We should also consider the time the device is connected and the number of devices/connections needed. Since we are discussing mainly smaller processes, how does this CI/CD scale when there are a huge number of devices that connect to a network for a brief time and need to all be updated simultaneously. We may also like to download information for the devices and forward them to a database for further analysis. This could be an interesting conundrum to tackle when we get there.
-
Testing & Results – The major reason we are trying to active HIL with a modern CI/CD is to do better testing. Ideally, we would like to run code on a target device, observe and capture the behavior, then change the hardware code and/or configuration and run another test. This will be something we would like to do along the way, in simulation, on test hardware, and in production. This too will be a problem for a later time when things are running smoothly.
Final Thoughts
As our quest for HIL continues, I find the problem space to be more and more intriguing. While simulation testing and HIL are not new concepts, applying modern CI/CD concepts to HIL is an interesting technological junction. A lot of the work is around figuring out how, not if, all the moving parts fit together. There is much more to do, but the basic building blocks are already in place and we can start to see how a modern HIL CI/CD will look like and what the next steps will include.
To be continued…