CIO LEVEL SUMMARY:
-
Convolutional Neural Networks (CNN) expand the principles of Feed Forward Neural Networks in order to preserve spatial relationships between input data.
-
CNNs are especially useful for image data, since pixels often have strong relationships with their surrounding pixels.
-
Spatial relationships are preserved by sliding a filter matrix (or kernel) across the matrix and performing the convolution operation. Using the same weights for the filter at each location allows CNNs to recognize features no matter where they are in the image.
-
Convolution filters often help detect features such as edges or curves which can help the CNN classify the image.
-
Pooling is used to reduce the dimensions of the convolved image in order to make it more manageable to use.
-
The output of the convolutional and pooling layers is fed into at least one Feed Forward layer in order to classify the image as desired.
WHAT ARE CONVOLUTIONAL NEURAL NETS?
Neural Networks are incredibly useful models that can learn complex
relationships between inputs and an output or prediction–like using a
patient’s vital signs to predict risk of heart disease. However, plain
Feed Forward Neural Networks aren’t equipped to handle situations in
which the input data has spatial relationships. Simple Feed Forward
Neural Networks take in one dimensional vectors as input, which
discounts any spatial relationships between these inputs.

If you wanted to feed a small black and white image–like a handwritten
digit from the MNIST dataset–into a simple Feed Forward Neural
Network, you could take a matrix of the pixels and flatten it so that
instead of a 28×28 pixel square, you get a single, one dimensional
vector that is 784 pixels long. Below, a 3×3 matrix of pixels is shown
flattened into a one dimensional vector of 9 pixels.


And for smaller, simpler problems like classifying the MNIST digits,
transforming a 2D matrix of pixels into a 1D vector of pixels can be
surprisingly effective.

MNIST digits from Wikipedia
But often, the images that we want to work with are much more
complicated.
When we flatten an image into a 1D vector, we lose information about the
spatial relationships between the pixels. A pixel in one area most
likely has strong relationships with the pixels surrounding it. If we
want to look at an MRI to recognize things like tumors, lesions, or
hippocampal volume, the spatial relationship between pixels is
incredibly important.
Convolutional Neural Networks (CNNs) allow us to take advantage of the
spatial relationships of numbers–whether they’re pixel values or
not–in our neural network architecture. There are three new “steps”
that we can use in a CNN that we didn’t have when we built a Feed
Forward Neural Network in the last article. Convolution,
Detection, and Pooling.
CONVOLUTION
First, we’ll consider a simple black and white fluorescent microscopy
image. This is a mitochondrion from a HeLa cell.

We also have images (courtesy of the National Institute on Aging), of 9
other types of organelles.

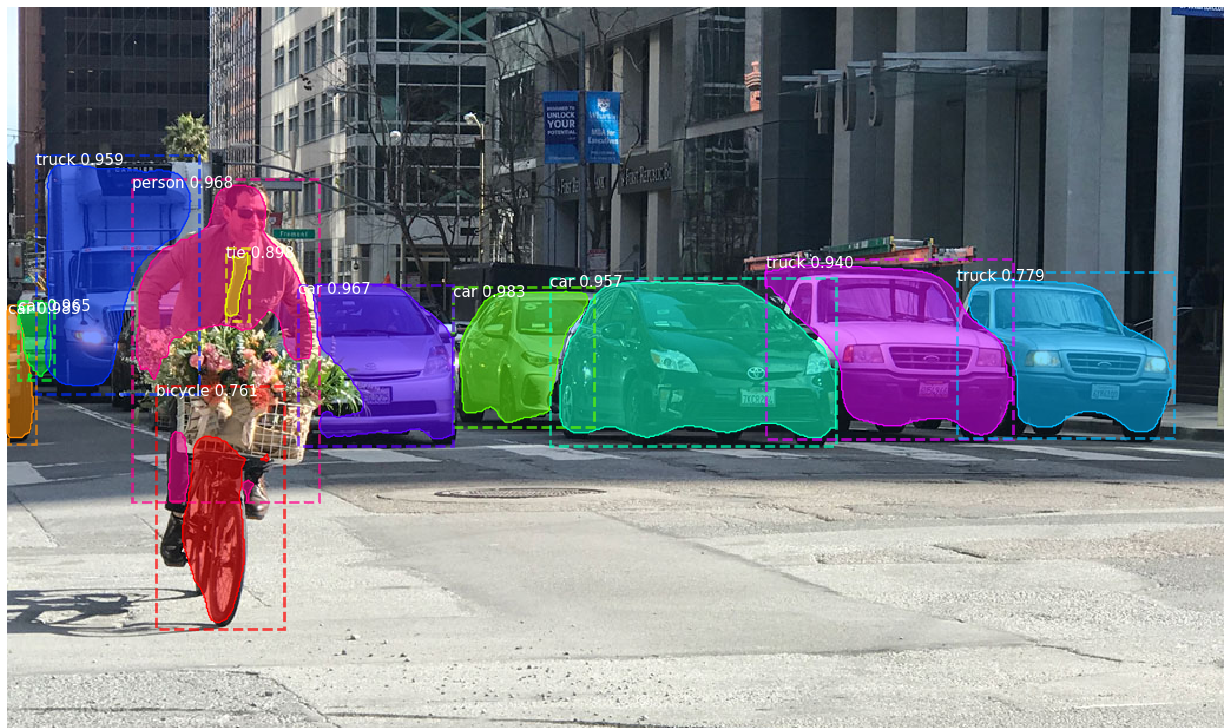
We can use a Convolutional Neural Network in order to classify new
images as one of the 10 types of organelles in this dataset (Nuclei,
Endoplasmic reticulum, cis/medial Golgi, cis Golgi, Lysosomes,
Mitochondria, Nucleoli, Actin, Endosomes, and Microtubules).
We can represent an image as a matrix of pixels. On the left is the
numeric version our our matrix, on the right is the same matrix, but
with the corresponding color for each pixel. 0’s are black, 1’s are
white, and anything in between is a shade of gray.


To preserve the spatial relationships between the pixels in these
images, we create matrices called filters (or kernels) which we can
slide over the matrix of pixels in the image.
A filter that looks for edges might look like this.

The convolution operation takes the dot product of the filter, and the
matrix of pixels it is on top of. This particular filter is useful,
because the scalar output of the dot product will be LARGE if there is a
big difference between the center pixel and surrounding pixels (i.e. an
edge), and small if there’s a small difference between the center pixel
and those around it (i.e. not an edge).

When we multiply each element of the filter with the value of the pixel
under it, and add all these up, we get a single number, in this case,
-1.41.

In general, if we call the filter F, and the submatrix M, then
convolution is
We then slide the filter to the next position, take the dot product, and
repeat. To decide the next position, we have to define the stride,
which tells us how far to move the filter for the next calculation. Here
we have a stride of 1 since we’re moving the filter by one pixel each
time.

In this case, our matrix of pixels is 10×10, and our filter is 3×3, so
with a stride of 1, our output will be 8×8. In general, the dimensions
with matrix Width W, Stride S and Filter width F will be (((W-F)/S) + 1)
But often, we want our output to be the same size as our input. So we
surround our image with a “padding” of 0’s. Our original matrix looks
like this:

To pad it, we add a row of 0’s at the top and bottom, and a column of
0’s at either side.

This allows our output to have the same dimensions as our original
input, which is often useful when working with images.
Using our filter and our padded matrix, we get this output.

At the (2,2) location, you can see the -1.41 that we calculated above.
Plotting a rescaled version of this matrix (so that each value is
between 0 and 1), we can see that this filter does detect edges
relatively well.


Now, we’ve completed the convolution step. But, just like with Feed
Forward Neural Networks, we often want to use some kind of activation
function to scale our output and introduce some non-linearity.
Sigmoid activations like the logistic and tanh activations are often
useful, as well as the ever popular Rectified Linear Unit (ReLu).
Applying these functions elementwise to our output matrix is often
referred to as the Detector Step of a Convolutional Layer.
Edge detection filters are usually simple and easy to understand. But in
a CNN, the filters aren’t explicitly chosen, they’re learned by the
network through training.
The values of the filter matrix are often referred to as weights. And
these weights are often randomly initialized and then tweaked through
backpropagation or similar training methods.
The weights of the filter are tied, or shared. This means that they
don’t change as the filter slides over the image, which results in a
phenomenon called spatial invariance. This is really useful, since
it allows the CNN to recognize patterns or objects no matter where they
are in the image, because it’s using the same filter everywhere. It also
reduces the amount of weights (or parameters) that need to be optimized.
Less calculations means that the CNN can be trained both faster, and
often with less data.
In our organelle classification example, we want to recognize a
mitochondrion no matter if it’s in the center, or slightly offset.
POOLING
Convolution helps extract useful features from images. But when we’re
working with large complex images, we often want to reduce the amount of
features we have. To do this, we use Pooling. Pooling reduces the
dimensions of our output matrices so that we can work with smaller sets
of features.
Two popular forms of pooling are max pooling, and average pooling.
Similarly to the Convolution Step, in the Pooling Step we need to
specify the size of the filter that we want to use, and the stride. For
example, here, we’ll look at 2×2 sections of our matrix, and our stride
will be 2.

In max pooling, we take the maximum value of each 2×2 section, and
create a new, smaller matrix.

In average pooling, we take the average of each value in the 2×2 section
to create our new matrix.

Like with the Convolution step, the output of pooling on a Matrix with
width W, with Filter width F, and Stride S will be
(((W-F)/S) + 1) or 2×2 in this case.
In practice, we often use more than one convolution and one pooling
layer in our network. We can layer convolution, detection (activation),
and pooling layers to create Deep Convolutional architectures.
In many cases, we want to use Convolutional layers to generate
“features” that we can then feed into one or more Feed Forward Layers
that produce an output, like a decision about which of 10 organelles is
in an unseen image. So the last few layers of a CNN look similar to the
last few layers of a Feed Forward Neural Network.

APPLICATIONS
Let’s build a Convolutional Neural Network in Python to classify our
organelle data.
First, the necessary import statements.
import keras
from keras.models import Sequential
from keras.preprocessing.image import img_to_array, ImageDataGenerator
from keras.utils import to_categorical
from keras.layers import Dense, Conv2D, MaxPooling2D, Dropout, Flatten
from keras.layers.core import Activation, Dense, Flatten
from keras import backend as K
from keras.optimizers import SGD

from sklearn.model_selection import train_test_split

import numpy as np
import glob
import cv2
import random
We need a few packages and functions to build a Convolutional Neural
Network, each one will be explained as needed.
Before we start, we’ll define variables and a few useful functions that
will help us to load our organelle images into Python.
# variable definitions------------------------------
nclass = 10

#fun definitions------------------------------------
def load_image(path):
    # load the image
    image = cv2.imread(path,0)
    image = cv2.resize(image, (50,50))
    image = img_to_array(image)

    return image
def load_images(d):
    d2 = {}
    random.seed(42) #set seed in order to create reproducibility
    for k in d: #for each key in the dictionary
        random.shuffle(d[k]) #randomize image order
        imagesList = []
        for item in d[k]: #list
            imagesList.append(load_image(item))
        d2[k] = imagesList
    return d2
Next, we will find our images and load them into Python using the
functions we just created.
# get images ---------------------------------------
foldNames = glob.glob("hela/*")
d = {}
for folder in foldNames:
    # get folder names
    labelNames = glob.glob(folder+"/*.TIF") + glob.glob(folder+"/*.tif")
    d[folder[5:]] = labelNames

ims = load_images(d)

images = ims["dna"] +
 ims["mitochondria"] +
 ims["actin"] +
 ims["endosome"] +
 ims["er"] +
 ims["golgia"] +
 ims["golgpp"] +
 ims["lysosome"] +
 ims["microtubules"] +
 ims["nucleolus"]

labels = [1 for i in ims["dna"]] +
 [0 for i in ims["mitochondria"]] +
 [2 for i in ims["actin"]] +
 [3 for i in ims["endosome"]] +
 [4 for i in ims["er"]] +
 [5 for i in ims["golgia"]] +
 [6 for i in ims["golgpp"]] +
 [7 for i in ims["lysosome"]] +
 [8 for i in ims["microtubules"]] +
 [9 for i in ims["nucleolus"]]

data = np.array(images, dtype = 'float') / 255.0 #for color ims
labels = np.array(labels)
Now that our images our loaded into the array data and our labels (a
number indicating which organelle the picture contains) in the array
labels, we’re ready to start preparing to build a model.
First, we’ll need to create a training set and a testing set. We’ll use
the training set in order to train our CNN, and the testing set in order
to check how accurately our model performs on data it had never seen
before.
# Split data into training and testing sets----------------
train_data, test_data, train_labels, test_labels = train_test_split(data,labels,test_size=0.25) # use 25% of the data for test

trainY = to_categorical(train_labels, num_classes=nclass)
testY = to_categorical(test_labels, num_classes=nclass)
Convolutional Neural Networks often require a large amount of data to
train. While we have hundreds of images, it might be helpful to have
more to work with.
In order to “create” more data to train our CNN, we’ll use the
ImageDataGenerator() function from keras. This function uses our
existing data in order to generate new images for us to train our model
with. One way that the generator can create new images is by rotating or
shifting existing images. This not only provides new data points, but
also helps the network to learn to recognize the organelles no matter
where they are in the image. Check out the documentation for this
function to see a more in depth explanation of how it works.
# Augment Small Dataset--------------------------------------
aug = ImageDataGenerator(rotation_range=30, width_shift_range=0.1,
    height_shift_range=0.1, shear_range=0.2, zoom_range=0.2,
    horizontal_flip=True, fill_mode="nearest")
aug.fit(train_data)
Once we have our training set, we can specify the architecture of our
Convolutional Neural Network. We’ll do this using a function called
createModel(). Inside this function, we’ll specify the architecture of
our CNN.
def createModel(height, width, depth, n_classes):

    model = Sequential()

    # CONVOLUTIONAL LAYER 1
    # 32 filters, size 4x4
    model.add(Conv2D(32, (4,4), padding='same', input_shape=(height, width, depth), name ="conv_1"))
    model.add(Activation("relu"))

    # CONVOLUTIONAL LAYER 1
    # 64 filters, size 4x4
    model.add(Conv2D(64, (4,4), padding='same', name ="conv_2"))
    model.add(Activation("relu"))

    #POOLING
    model.add(MaxPooling2D(pool_size=(2, 2), strides=(1,1)))

    model.add(Dropout(0.2)) #avoid overfitting

    # fully connected layer
    model.add(Flatten())
    model.add(Activation('relu'))
First, we create a base model using Sequential(), then we keep adding
layers to our model. Our first Convolutional layer uses 32 filters, each
of size 4×4. Python will pad our images with 0’s so that the output from
the convolution is the same size as the original input.
Then, the output of the convolution is fed into a ReLu activation.
Next we add a second convolutional layer. This time with 64 4×4 filters.
Again, our images will be padded so that the input and output of the
convolution have the same dimensions. We feed this output through a ReLu
activation function, and finally we reach our Pooling Step.
Here, we’ll use Max Pooling, with size 2×2, and stride 1.
Now that we’re done with the convolutional parts of the network, we use
the function Flatten() in order to turn the output of our
convolutional layers into a one dimensional vector. After applying
another ReLu activation, we feed this–now one dimensional–vector
into a normal feed forward layer in order to get the organelle’s
classification. We use a softmax activation at the last layer in order
to get probabilities for each class of organelle.
We’ve laid the groundwork for our model, now we need to ask Python to
train it.
m = createModel(50,50,1,nclass)
b_size = 32
e = 1000

# train the network
print("Begin Training....n")
H = m.fit_generator(aug.flow(train_data, trainY, batch_size=b_size),
	validation_data=(test_data, testY),
	epochs=e, verbose=1)
Since we’re using stochastic gradient descent (which approximates the
gradient of the loss function using only a small sample), we need to
specify a batch size. Here, we chose 32.
We also need to define the number of epochs to use when training our
model. An epoch refers to a full pass of the training data through the
network. That means that each image in our training set will be sent
through the model.
This model might take a while to train, so if you’re in a rush, you can
reduce the number of epochs that your model will use. But don’t reduce
it too far. The network needs to see a lot of data in order to generate
a well performing model.
Once our model is done running, we’ll be able to see how it performed
(in terms of accuracy) on both our training and testing set (in the
model, this is also called the validation set).
CONCLUSION
The Convolutional Neural Network is a powerful tool for performing image
related tasks. CNNs have been used extensively in the medical and health
fields. They have been used to segment tumors1, find brain
lesions2, diagnose skin lesions3, and have even been used in
computer vision to recognize the location of surgical tools during
laparoscopic surgery4. And as these fields increase the amount of
image data they collect, the uses for CNNs will grow.
REFERENCES
-
Pereira, S., Pinto, A., Alves, V., & Silva, C. A. (2016). Brain
tumor segmentation using convolutional neural networks in MRI
images. IEEE transactions on medical imaging, 35(5), 1240-1251. ↩ -
Kamnitsas, K., Chen, L., Ledig, C., Rueckert, D., & Glocker, B.
(2015). Multi-scale 3D convolutional neural networks for lesion
segmentation in brain MRI. Ischemic stroke lesion segmentation,
13, 46. ↩ -
Kawahara, J., BenTaieb, A., & Hamarneh, G. (2016, April). Deep
features to classify skin lesions. In Biomedical Imaging (ISBI),
2016 IEEE 13th International Symposium on (pp. 1397-1400). IEEE. ↩ -
Choi, B., Jo, K., Choi, S., & Choi, J. (2017, July).
Surgical-tools detection based on Convolutional Neural Network in
laparoscopic robot-assisted surgery. In Engineering in Medicine and
Biology Society (EMBC), 2017 39th Annual International Conference of
the IEEE (pp. 1756-1759). IEEE. ↩
![Raft [R]DP Blog Post - Thumbnail Image](https://teamraft.com/wp-content/uploads/Raft-RDP-Blog-Post-Thumbnail-@2x.jpg)